Tuesday, 29 September 2015

iTunes Album Art
Find Missing Album Art Automatically in iTunes

One of the disadvantages many of us who had MP3 collections before the trend of iTunes and Amazon MP3 is that many of the files lack album art. It’s annoying to browse through CoverFlow and see half your library with pretty pictures and the other half with a generic Icon. Here’s a step-by-step guide to make iTunes search for album art for you.


1. If you haven’t already, download and install iTunes from Apple’s site.

2. During the initial set up, iTunes will encourage you to create an account. While you don’t have to make anaccount to use the application, you do need an account to search for album art. Creating an account is easy, free and only requires an active email address.

3. Wait for the initial set up to finish and import your music library. While this happens, ensure that you are logged in by clicking on the “Store” tab and seeing if it asks you to log in. If so, then you’ll need to enter your email andpassword. If not, you’re already logged in and can move on to the next step.

4. Once all of your music library has been entered into iTunes, click on the Music tab.

5. On the information directory, at the top of the application, click the tab that says “Advanced”

6. In the “Advanced” dialog box, click “Get Album Art Work”

7. The status bar will change to “Getting Album Artwork”. This may take a while depending on the size of your library.

8. After a little while, the status should change to “Downloading Album Artwork” . This again may take a while depending on your music library.

9. Change your view to “Cover Flow” and you will see all or most of the albums missing art work now have some.

This tutorial will work on devices running Windows and/ or Macintosh.

Have you ever left your PC in a hurry? Have you ever felt that it is a pain to lock your system in the simple way by doing CTRL+ALT+DEL? I would imagine that you have and then, this trick is for you. This trick enables you to create a shortcut to lock your computer instead of doing the regular CTRL+ALT+DEL, thus providing you a way to quickly and easily get away from your PC whenever you are in a hurry.


To use this trick, follow the instructions given below:-

Steps
  1. Right Click on an empty space on the Desktop, point to New and click on Shortcut.
  2. In the dialog box that pops up, type the following code without quotes in the Type the location of the item.
rundll32 user32.dll,LockWorkStation
     3.  Click on Next and type a name for the shortcut in the Type a name for this 
          Shortcut textbox.
     4.  Click on Finish.

Create a Shrtcut to lock your System

Now you will be able to lock your computer by double clicking on the created shortcut. You can also add this shortcut to the Quick Launch toolbar to lock your system with only a single click.


Lock Folder Windows
All of us have some files and folders that we consider private. They can be anything from our business documents to pictures of friends and family. These are files that we don't want other people using our computer to know about. As Windows offers no way to protect our private information, most of us get in awkward situations when these files are discovered by unwanted people.

Surely, you can store this information in a hidden folder. The only problem is that anyone can easily search the contents of a hidden folder using Windows Search itself.

The only viable solution is storing this content in a password protected folder so that only those people knowing the password of the folder can access it. There are many folder locking programs available online but the problem is that most of the good ones are paid. Even if you do manage to get a good free one, you will be looked at suspiciously when people see a folder locker in the list of your installed programs.

If you too find yourself in a similar situation, you can try Folder Protector, a password protector for Windows folders that is not only free but is also portable meaning that it does not need to be installed. Just click on the exe file and the program will start running. I have created this program based on suggestions and feature requests that I have received by email over the last two years.

Folder Protector

Folder Protector offers each user a protected folder that can only be opened by entering the password in FolderProtector. Unlike most security programs, Folder Protector is small in size (nearly 58KB) and does not show the folder that it is protecting. This gives an additional advantage that people who don't know the password do not have a target to try and hack their way into. As the software is portable, you can hide it or even delete it after protecting your folder and no one will have a clue that it was used. Then whenever you need to access protected files, you can re-download the program from this page, enter the password and access your protected files.

Download Folder Protector

Download for Windows 8, Windows 7 and Windows Vista

Download for Windows XP


Important: 1) This program uses a simple method to lock files and should not be used to protect truly sensitive information. It is best to encrypt that kind of information.

2) Do not refresh your Windows when your folder is locked. Doing that will delete your files.

How to use Folder Protector?
When you run Folder Protector for the first time, the program will ask you for a password that you want to use. Enter a password that you can remember as this will be the password to your protected folder.

Lock Folder With Password

After entering the password, the program will open a folder named SecuredFILES. This is your protected folder. You can add all your private files in this folder. This folder is located at the Desktop. After adding all your files, you may close this folder.

Then, you can use the menu in the program to lock your folder. To lock the folder, type lock as your action. After successfully locking the folder, FolderProtector will display that the folder is locked.

Free Folder Lock

Unlocking the protected folder is easy. Just type unlock as your action. Then the program will ask you to enter your password. Upon successfully entering the password, the program will display the contents of your protected folder.

Changing the Password: Just type change as your action. The program will ask you for your current password. Upon successful entry of the current password, the program will ask for your new password and change it instantly.

Acknowledgment: This software has been made possible only through the suggestions of readers of this blog, especially Ernell Albert Galido for his idea of using a menu based interface.

Windows Compatibility: This program has been successfully tested on Windows 8.1, Windows 8, Windows 7, Windows Vista and Windows XP.

Monday, 6 July 2015


Thursday, 11 June 2015

YouTube-Kids-Screenshot-android


YouTube is the biggest video sharing platform available and it has tons unsafe and explicit content hosted on the website. Last week it was reported that YouTube is going to releasea kids-friendly version of YouTube to ensure a more age-friendly engagement of kids.
Today, YouTube launched the Android and iOS app YouTube Kids. YouTube called it the “first Google product built from the ground up with little ones in mind.” This kids’ version of YouTube was rumored to be in works since 2014.
Let us take a look at the main features of the YouTube Kids app:

Bright and playful design:

The design of the YouTube Kids app is bright and playful. The images will be larger and icons will be bold which makes it easy for your 4-year-old  to navigate with his little thumbs. Also, the app is having a voice search so that if your kid can’t spell or type, he/she still can find videos of his/her requirement.

Family-focused content:

The contents on YouTube Kids Will be appropriate and narrowed down. Family-focused content will be shown so that the parents can relax knowing that his kid is safe with it. You can browse channels and playlists in four categories: Shows, Music, Learning and Explore. Or, you can search videos of particular interest, like tutorials on maths, science etc.

Parental controls:

Parental controls are the highlight of YouTube Kids app and it gives you a better control over your child activity on the YouTube app.YouTube-Kids-Screenshot-android-
  • Timer: You can set the timer to limit the screen time. It will alert your child when the session is over, and then automatically turn off.
  • Sound settings: You can turn off background music and sound according to your need.
  • Search settings: You can also limit the search on YouTube Kids.
  • Product feedback: You can also give feedback of the product in YouTube Kids in order to improve the quality of the app.

youtube-tips-and-tricks

It wouldn’t come across as a surprise to anyone if I say that today the word Video has become synonymous with YouTube. Think tutorials, music videos, movie trailers, game-plays, gadget reviews YouTube has a Pandora’s Box of videos to provide to everyone’s liking. It has even changed the lives of some people over time, ask PSY or Justin Bieber for that purpose.
The third most visited site on the Internet after Google and Facebook; over the years, YouTube has amassed over 1 billion users with an awe-inspiring 300 hours of videos being uploaded to the site every minute. I find it, perhaps the most productive way of being unproductive and killing time. So how about discovering some YouTube tips and tricks to add a completely new dimension to your YouTube experience.

Common Keyboard Shortcuts:

We begin our YouTube tips and tricks article with the basic keyboard shortcuts which I hope almost everyone will be aware of:
Space-Play/Pause
F-Fullscreen
Esc-Exit Fullscreen
-Increase Volume
-Decrease Volume
-Go back 5 Seconds
-Go forward 5 Seconds
In fact you can even skip parts of the video without mouse-clicking on the time slider by simply pressing the number keys on your keyboard. Pressing the 1 key skips 10% of the video, the 2 key skips 20% of the video and so on. Pressing the number 0, takes you back to the start of the video.
specific_start_time_youtube

Specific Start Time:

This is one handy YouTube trick which allows you to start a video from a specific time instead of having to tell people the specific time where the boring introduction gets over or point to the part of the video where the real fun begins.
Here is how it works. Consider the following YouTube URL:
https://www.youtube.com/watch?v=A0pLbTXPHng
Now to jump to a 1:23 in the video just simply add #t01m23s to the linkhttps://www.youtube.com/watch?v=A0pLbTXPHng#t=01m23s
It would look like this:
specific-start-time-youtubeOne more way you could do this is to use the Get Video URL at current time by right clicking the mouse on the time slider at the desired time and clicking on the Get video URL at current time option.
current-time-url-youtube
timeurl-dialogbox-youtube
A dialog box containing the link will be generated. Just copy the link and use it to you like.

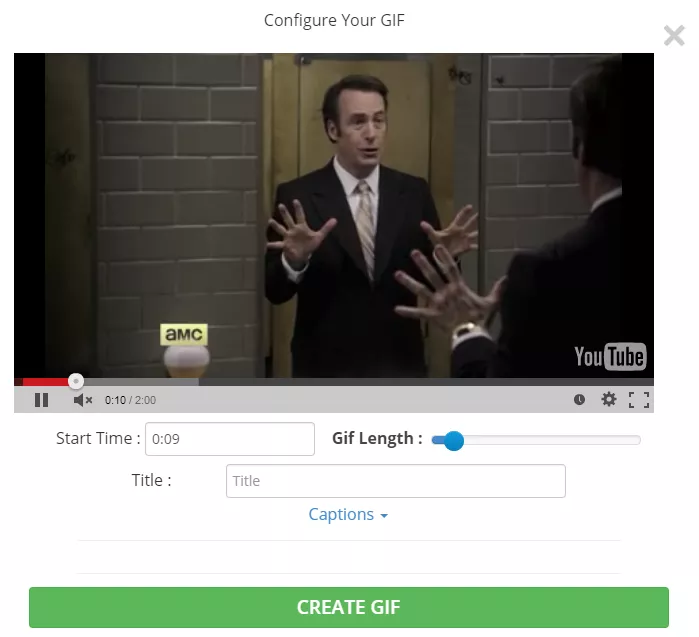
Turn any video into a GIF:

The next addition in YouTube tips and tricks articles is my favorite.
Who doesn’t like a funny old GIF! Well good news for you, it is pretty simple to create a GIF out of a YouTube video. All you need to do is add the word ‘gif’ just after the ‘www.’ in the URL.
For example: Consider this YouTube URL: https://www.youtube.com/watch?v=9q4qzYrHVmI#
You just have to modify it like this: https://www.gifyoutube.com/watch?v=9q4qzYrHVmI#

It shall redirect you to a page where you can make a GIF as per your required specifications in a matter of minutes. In fact you can even enter captions in your GIF image through this tool.
GIF-YouTube
YouTube Tips and Tricks – GIF

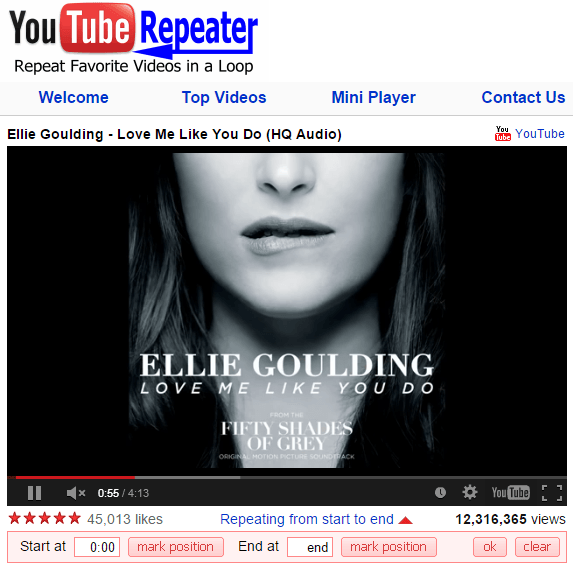
Repeat The Complete Video or Parts of it Automatically:

There are times when we stumble upon a video which no matter how much we try we can’t resist watching again and again. It could be a music video, a funny prank or perhaps an awe-inspiring stunt scene from some movie. To repeat certain portion of the video or the complete video all you need to do is to add the word ‘repeater’ after ‘youtube’ in the URL.
For example: Consider this YouTube URL: https://www.youtube.com/watch?v=D6DFLNa6MBA
Just change it to: https://www.youtuberepeater.com/watch?v=D6DFLNa6MBA
It shall redirect you to a page where you can loop the required portions of the video.
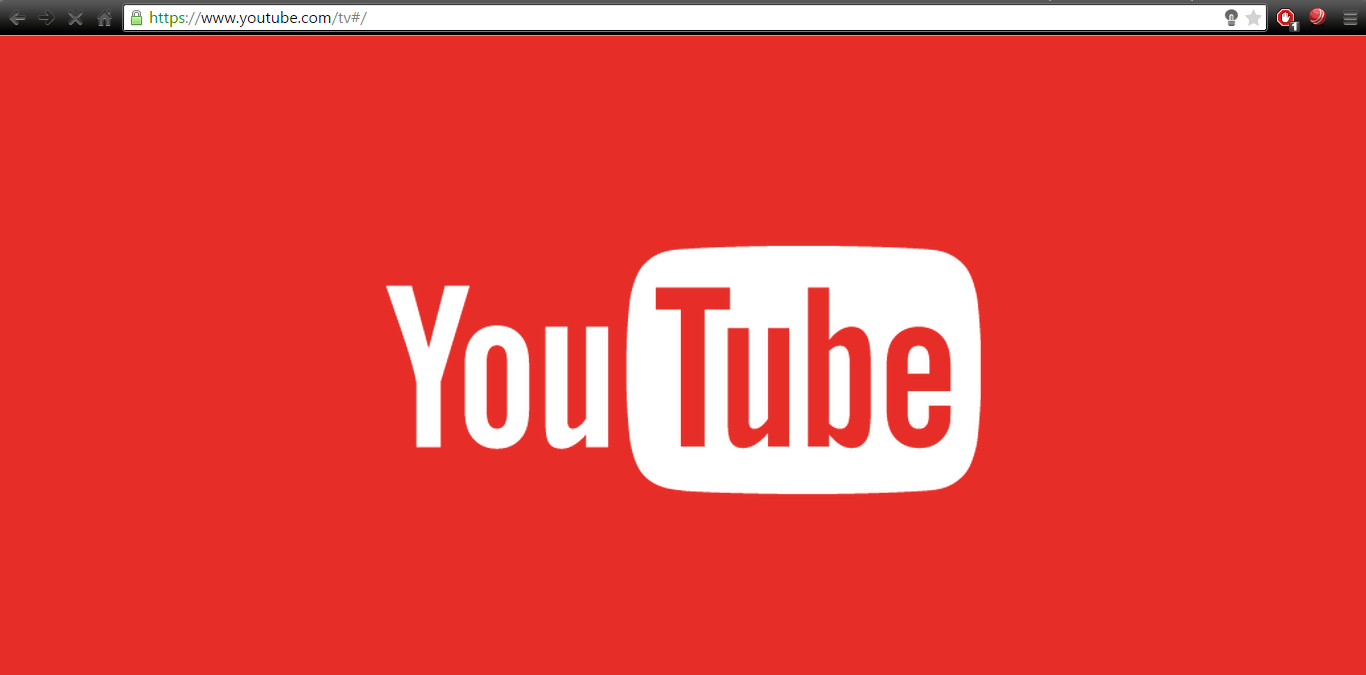
youtuberepeater

YouTube Leanback:

Watching YouTube videos on your TV using the normal YouTube desktop version can be a cumbersome experience. That’s where the YouTube Leanback feature comes in, it is basically a simplified UI version enhanced for TV which recommends videos for you to watch according to those that you have watched before and can be controlled simply using arrow keys.
All you need to do is go to youtube.com/tv , leanback and enjoy the viewing experience.
youtubeleanback
In fact you can even pair you smartphone or tablet for having a hassle free experience. Click here to know how.

Bypass Regional Restrictions and Blocks:

bypassrestrictions-youtube
YouTube Tips and Tricks – Bypassing Location Restriction
I am sure almost all of us would have encountered the irritating experience of opening up a pretty hyped video only to stumble across a block which prevents us from playing the video. YouTube tips and tricks isn’t complete without this.
In order to bypass this restriction, simply change the format of the link from this: https://www.youtube.com/watch/?v=dD40FXFhuag
To this: https://www.youtube.com/v/dD40FXFhuag

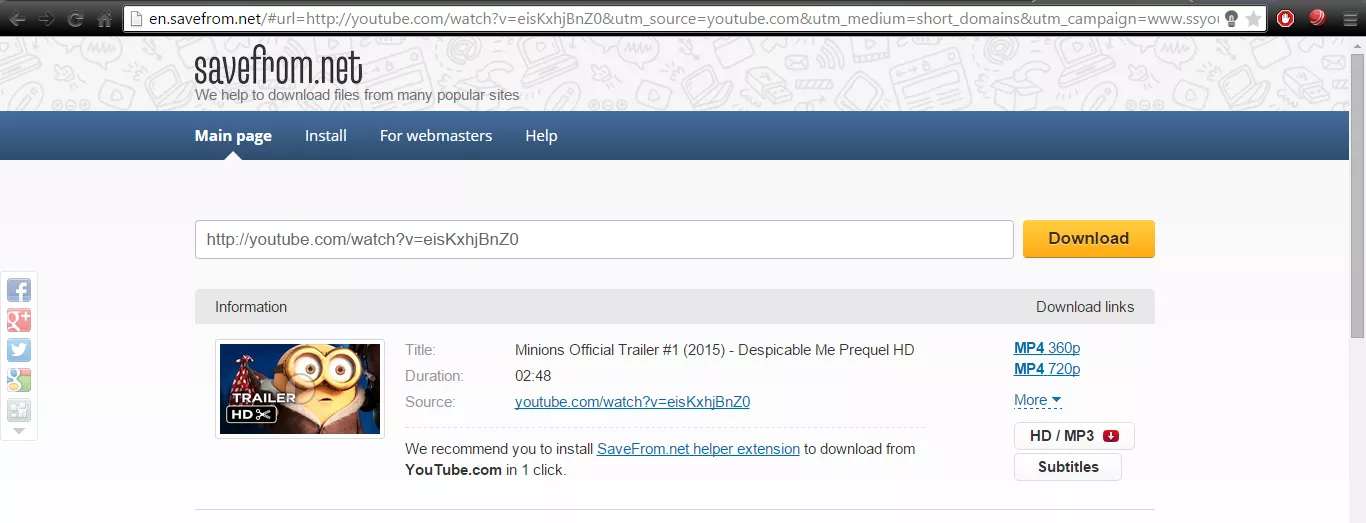
Download YouTube Videos:

Wish to download a YouTube video so that you can watch it sometime later. All you need to do is add ‘ss’ after ‘www.’ in the URL of the YouTube video.
For example: Consider this YouTube URL: https://www.youtube.com/watch?v=eisKxhjBnZ0
Just change it to: https://www.ssyoutube.com/watch?v=eisKxhjBnZ0
You will be redirected to a page from where you can download the video in the desired quality and format.
downloadvideos-youTube
YouTube Tips and Tricks – Video Downloading
Just be careful that downloading the video doesn’t infringe the copyrights of the owner.

Accurate Keyword Searching:

Finding the exact video that you want to watch on YouTube can prove to be a time-consuming experience provided the fact that there are billions of videos on the site with more and more being added every day. To refine your search and reduce the time involved in finding your desired video try using the allintitle keyword.
allintitle-youtubeDoing so will return you results which have all the chosen keywords.

Other Common YouTube Tips and Tricks That You Might Have Overlooked:

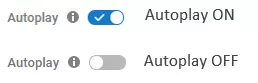
Autoplay- In case you do not want to play the suggested video after the one that you are watching currently, just disable the autoplay feature found towards the right corner of the page.
Autoplay-YouTube
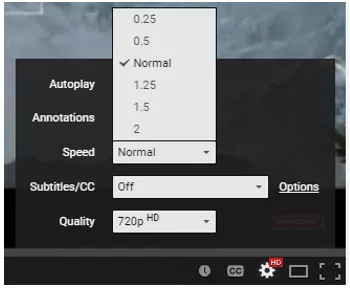
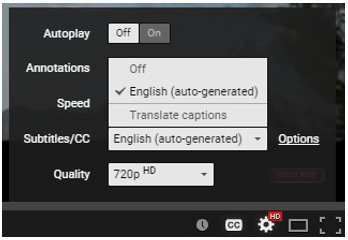
Speed- You can alter the speed of the video and play it faster or slower to your like. Just click on Setting on the time slider, go to Speed and then choose the speed that you prefer.
speed-youtube
Subtitles- You can even enable subtitles for a video in YouTube. Head to settings on the time slider and then click on Subtitles and turn them on! Although, this feature is not available for some videos.
subtitle-youtube
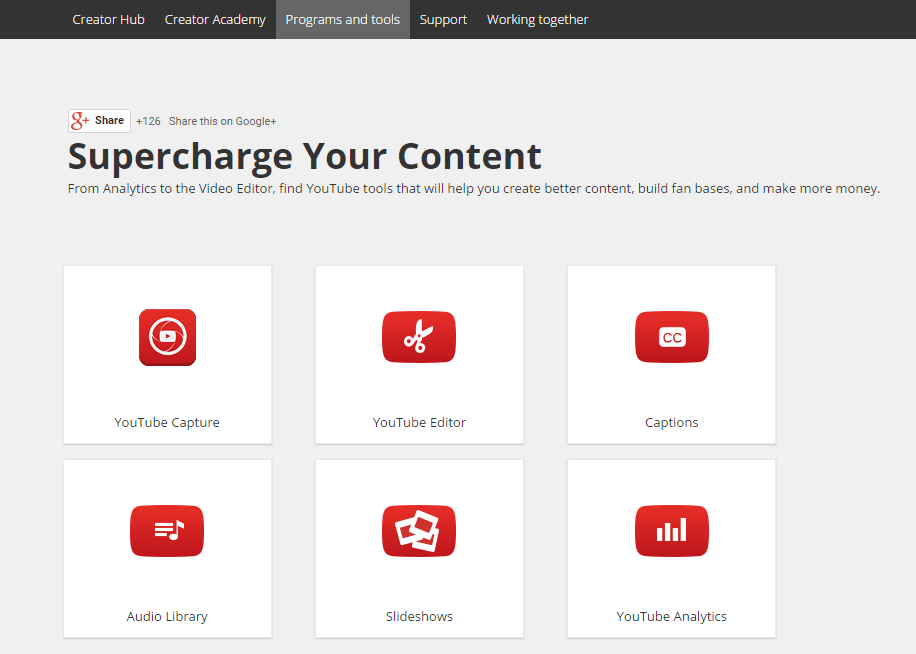
YouTube Tools – Most people might not be aware but YouTube also provides certain tools so as to help the user in creating new content. There are a variety of tools from Analytics to the Video Editor which you should definitely try using at-least once.
youtubetools

Monday, 18 May 2015

Send files from one computer to anotherIn this article you will find out  how to Send files from one computer to another with Lan cable (cat5). I never liked using big pen drives to share large data ( like big games,movies etc) so the only thing I am left with, was using lan cable.


When to use lan cable Send files from one computer to another
It would be very tiring to keep on inserting and removing pen drive again and again. And if you hate this too, then you have come to right place, after reading article I am sure you will able to send and receive files using Lan cable.

Advantage of LAN cable over others

  • Fast data transfer.
  • You don’t have to stand there and waste your time. Do the setup once and you can move on to your other work.
  • Looks cool

Things that you required

  • Two laptop (mandatory)
  • A lan cable (obviously)
  • Little bit of your time and patience (only if it’s your first time)
Step 1
Connect one computer to another using lan cable.
Step 2
OK now you have to enable sharing option on both computers.
Go to Control Panel> Network and Internet> Network and Sharing Center > Advanced sharing settings.
enable sharing option .
Enable sharing option
Make sure you turn on network detection and turn off password protection off.
Step 3
Bring both the computers on same network.
1. Open control panel Control Panel >> Network and Internet >>Network Connections.
connect two computer using a lan cable
2. You will see Local Area Connection 2 .
3. Right click it and navigates to properties .
4. You will see tcp/ ivp4 option there and select it’s properties .
Connect two computer using a lan cable
5. Select this use the following ip address

Put the following value on 1st computer

  • Ip address 192.168.1.1          
  • Subnet mask 225.225.225.0
  • Default gateway 192.168.1.3
                                                
1st laptop ip address

Put the following value on 2nd computer

  • Ip address 192.168.1.3
  • Subnet mask 225.225.225.0
  • Default gateway 192.168.1.1
2nd laptop ip address
Basically what we are doing is keeping the subnet mask same and changing the ip address . You might have seen others values on different websites, all are correct but if you are not familiar with networking I would suggest that you stick to these values only. If everything went good you will see the two computer name in the Networks.
two computer connected under same network using lan
Two computer connected under same network using lan
Step 4

Share a folder on lan

Assuming that you have connected the cable properly and enable the sharing option now it’s time Send files from one computer to another , this is very simple
1.Select the folder you want to share, right click it .
2.Select share this >> specific people.
share dataa using lan cable
3. On the drop down menu select everyone >> add >> click share.
How to share a folder on lan